
Inflatable Ice Bath User Manual
KOVE
Inflatable Ice Baths
USER MANUAL
Setup • Use • Care
Models: IBRB, IBRW, IBCB, IBCW, IBPB, IBPW
A practical guide to preparing, using and caring for your KOVE
inflatable ice bath.
Read this manual before inflation or filling. Keep it for future reference.
Applies to KOVE inflatable ice baths with a separate inflatable lid.
Components and valve positions may vary by model. Always follow the
pressure limit marked on your product.
1. Check the Supplied Items
Check Your Equipment
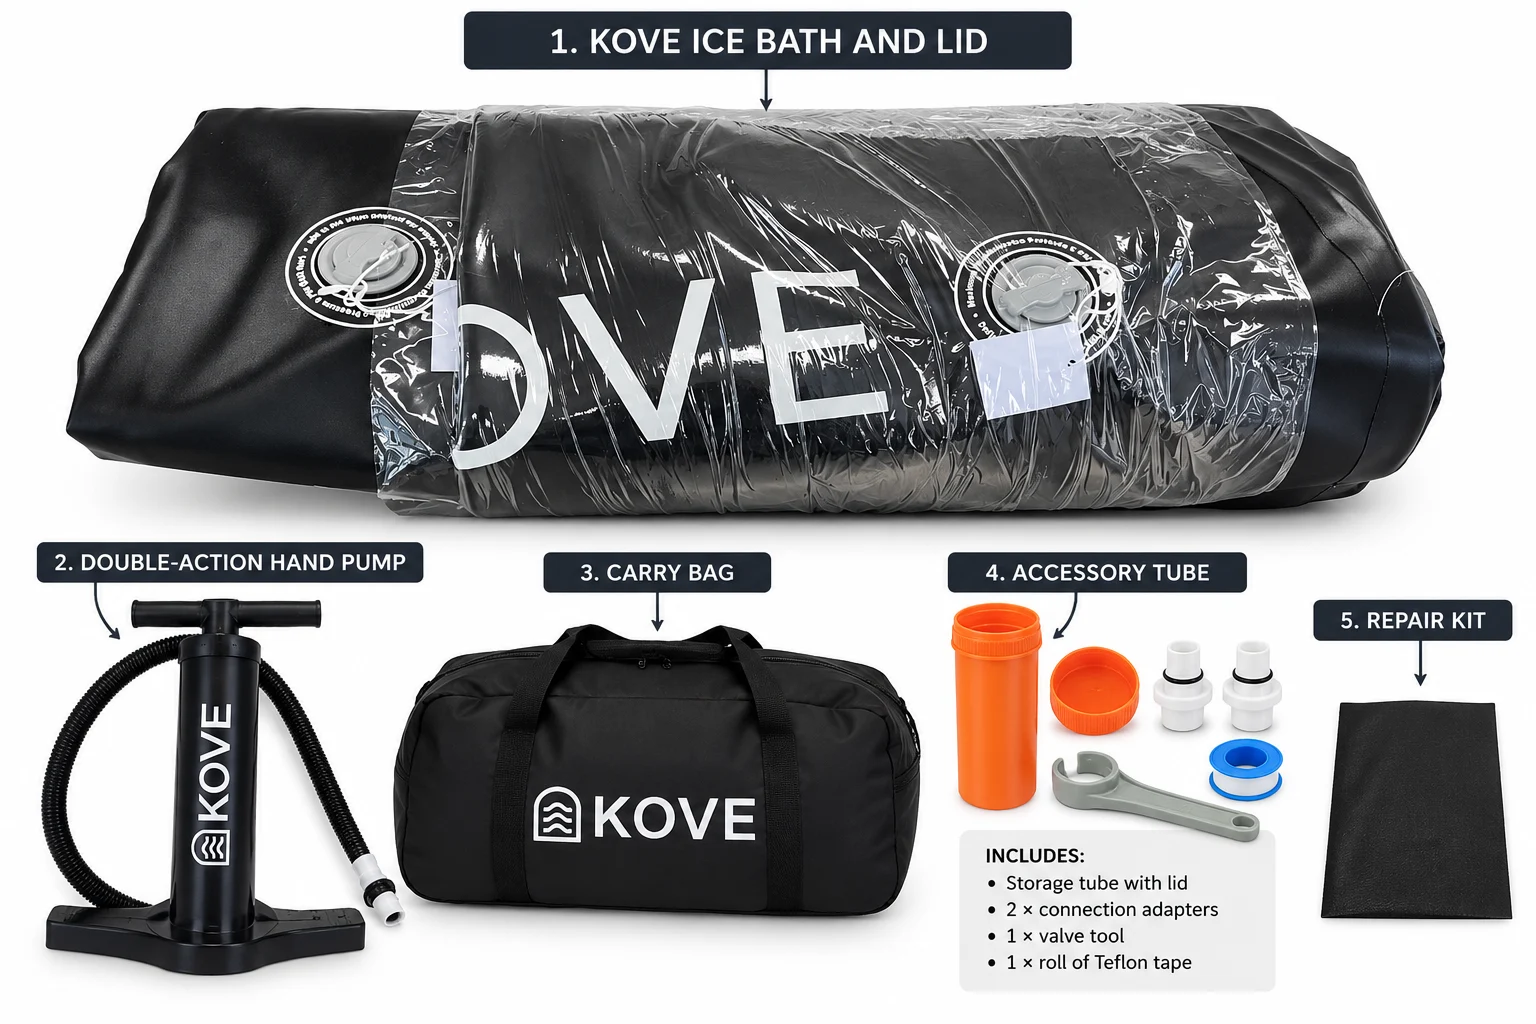
Check that you have the ice bath, protective lid, hand pump and carry
bag. Check your order for any model-specific fittings, adapters or
accessories. Inspect the bath, seams, valves and pump hose for
damage before use.
2. Before You Begin
Choose a Suitable Location and Prepare Your Bath
Use a clean, flat, level surface, free from sharp stones and debris.
Allow clear space to enter and exit safely and to access the valves.
Choose a location where water can be drained safely. Keep away from
electrical outlets and equipment that could be splashed.
The surface must support the combined weight of the bath, water
and user. Each litre of water adds approximately 1 kg. Do not
place a filled bath on a balcony, raised deck or suspended floor
unless its load capacity has been confirmed.
Wash the inside with warm water and mild soap. Rinse thoroughly
to remove soap residue. Use a soft cloth; do not use abrasive
pads or strong bleach-based cleaners.
A filled bath presents a drowning risk. Keep children and pets
away. The lid is a protective cover, not a safety barrier, seat
or load-bearing surface.
3. Inflation & Filling
Set Up the Bath Before Adding Water
Unfold the bath on your prepared surface. Identify the inflation
valve on your bath; do not confuse it with the water inlet or
outlet ports. Remove the air-valve cap. Make sure the valve is
in its inflation / closed position so air stays in when the
hose is removed.
Securely attach the pump hose to the air valve. Inflate gradually
until the bath is firm, checking the pump gauge as you go.
Follow the pressure marked on your KOVE product. Do not exceed
that limit and do not use an air compressor.
Remove the pump hose and fit the valve cap securely. Repeat with
the lid, using the pressure limit marked for the lid. Do not
assume the bath and lid have the same pressure requirement.
Apply Teflon tape to male threads on water connections that
require thread sealing before connecting fittings or adapters.
Do not apply tape to the air valve or connections that seal
with a washer or O-ring. Tighten securely without overtightening.
Confirm the drain is closed and unused water ports are securely
capped.
If using a KOVE chiller, follow the
KOVE Ice Bath Chiller User Manual on our website
for connection and startup instructions before filling.
Start with the bath about half full and allow room for your body
to displace water. Never exceed two-thirds full or the marked
maximum fill level, whichever is lower.
Air pressure can increase in heat or direct sun. Check the bath
before use, avoid prolonged direct sunlight and follow the
product pressure label. If no pressure limit is visible, contact
KOVE before inflating further.
4. Using Your Ice Bath
Read the Safety Information Before Every Session
Check that the bath is firm, stable and leak-free. Check the
water temperature with a suitable thermometer. Keep the
surrounding surface dry and clear. Remove the lid completely
and have a towel and dry clothing ready. Do not use under the
influence of alcohol or drugs.
Cold water can cause sudden changes in breathing and strain on
the heart. Seek medical advice before use if you are pregnant,
have a heart or circulation condition, high blood pressure,
diabetes, a seizure disorder, reduced sensation, or another
health concern. Do not use with open wounds or while unwell.
Do not use alone; have another adult nearby who can assist.
Enter slowly, keep your head above water and breathe normally.
Do not dive, hold your breath or practise deliberate
hyperventilation. Never stand or sit on the rim or lid.
Begin conservatively. There is no universal safe time based only
on water temperature. Leave immediately if you feel dizzy,
faint, numb, unusually breathless or distressed. Dry off and
warm up gradually. Seek urgent help for chest pain, collapse
or persistent breathing difficulty.
Replace the protective lid when the bath is unattended, while
maintaining measures that prevent child access. Check the
water condition and clean or change it when needed.
5. Water Treatment & Hygiene
Maintain Clean Water and Protect Your Bath
You can use standard spa or ice-bath water treatment products,
including chlorine or bromine, that are suitable for your bath
and any connected equipment. Use a correctly maintained
sanitiser level within the chemical manufacturer’s recommended
range. Avoid excessive concentrations, but never reduce the
dose below the level required for effective sanitisation.
Aim for a water pH of 7.2–7.6. Check pH and sanitiser
levels regularly with a suitable test kit or test strips,
including before use. Follow the chemical manufacturer’s
directions for dosing, testing and when it is safe to enter
the water.
Do not place concentrated chemicals directly onto the bath
material or surface. Dilute or pre-mix only where the product
instructions require it, then distribute and circulate the
water properly. Never mix different chemicals together.
Keep treatment products out of reach of children.
Sanitiser helps control bacteria and algae; a filter removes
physical debris. Filtration alone does not sanitise the water.
A chiller and filter system does not remove the need to test,
maintain and periodically replace the water.
Replace water periodically according to frequency of use,
number of users and how well the water is maintained. Drain
and clean sooner if the water is cloudy, develops an odour
or the surfaces feel slippery. Excessively high chlorine or
bromine concentrations can shorten the life of inflatable
bath materials and seals.
6. Cleaning & Storage
Keep the Bath Clean, Dry and Protected
Check water before each use. Drain and clean immediately if
it becomes cloudy, develops an odour, contains debris or
feels slippery. Rinse your body before entering and keep
the lid on between sessions. Drain and clean at least every
two to three weeks; clean more frequently depending on use
and conditions. A chiller does not replace water hygiene.
Switch off and unplug any connected chiller. Direct the drain
hose to a suitable drainage point before opening the drain.
Keep discharged water away from electrical equipment and
walkways. Do not force the drain fitting. Close the drain
after emptying. Never drag or lift the bath while it contains
water.
Clean the inside and outside with warm water, mild soap and
a soft cloth. Rinse thoroughly and allow the bath and lid
to dry fully. Avoid strong bleach-based detergents, solvents
and abrasive cleaners. Follow the separate chiller manual
for filter and chiller maintenance.
Only deflate after the bath is completely drained. Remove
the air-valve cap and release air using the valve mechanism
for your model. Keep your face away from escaping air.
Gently fold without forcing sharp creases, then place the
dry bath, lid and accessories in the carry bag. Store in a
cool, dry place away from sunlight and sharp objects.
Do not leave a filled bath in freezing conditions or expose
it to excessive heat. Keep it away from flames, heaters,
sharp objects and pets that could puncture the material.
7. Troubleshooting & Support
Simple Checks Before You Contact KOVE
Air pressure may vary with temperature. Check the cap and
valve, then check pressure against the product label.
If air loss continues, empty the bath and inspect for a
leak. Do not exceed the pressure limit to compensate.
Check that the air valve is set to its inflation / closed
position. Reconnect the pump and inflate within the marked
limit, then remove the hose and secure the cap.
Stop any connected chiller and lower the water level if
needed. Inspect the fitting, seal or washer. Reconnect
according to the setup guide, applying Teflon to threads
that require it. Do not force or overtighten fittings.
Stop using the bath. Drain, clean and rinse it, then refill
with fresh water. Check any connected filtration system
using its own manual.
Switch it off immediately. Check water level, open valves,
hose kinks, filter condition and priming. Follow the
chiller manual before restarting.
Contact KOVE using the details on your order confirmation or at
www.kovedesigns.com.au.
Include your order number, model, a description of the issue
and clear photos or video. Keep your proof of purchase.
Warranty terms are those supplied with your order.