
Hyperbaric Chamber User Manual
KOVE
BALANCE BY DESIGN
HBOT Chamber
USER MANUAL
SETUP | CONNECTIONS | OPERATION | CARE
Welcome to Your KOVE HBOT Chamber
This manual provides instructions for setting up, connecting, operating and caring for your KOVE soft-sided inflatable HBOT chamber.
Select a dropdown below to view the relevant instructions. Read all safety information before operating the equipment.
01. Before You Begin
STEP 1 — POSITION & INSPECT
Place the chamber on a clean, dry and level surface. Inspect the chamber, inflatable support, zippers, valves, tubing and connections for damage or obstruction.
STEP 2 — CHECK THE SUPPLIED EQUIPMENT
The supplied packing list includes the chamber, oxygen machine, three transparent connection tubes, an air-column inflation adapter and an oxygen mask, together with fittings and documentation.
Check that all supplied items are present before starting.
STEP 3 — LOCATE THE CONTROLS
Identify the two zippers, inflatable support nozzle, internal manual pressure-release valve, automatic pressure-release valves, three chamber supply inlets and matching machine outlets.
IMPORTANT SAFETY NOTICE
Do not use damaged equipment. Keep ignition sources, smoking materials and flammable or explosive items away from oxygen equipment and the chamber.
A trained attendant should remain available during use.
02. Connect the Three Supply Lines
Connection Points Reference
Use the diagram below to identify the chamber connection points, viewing window and pressure-release valve.
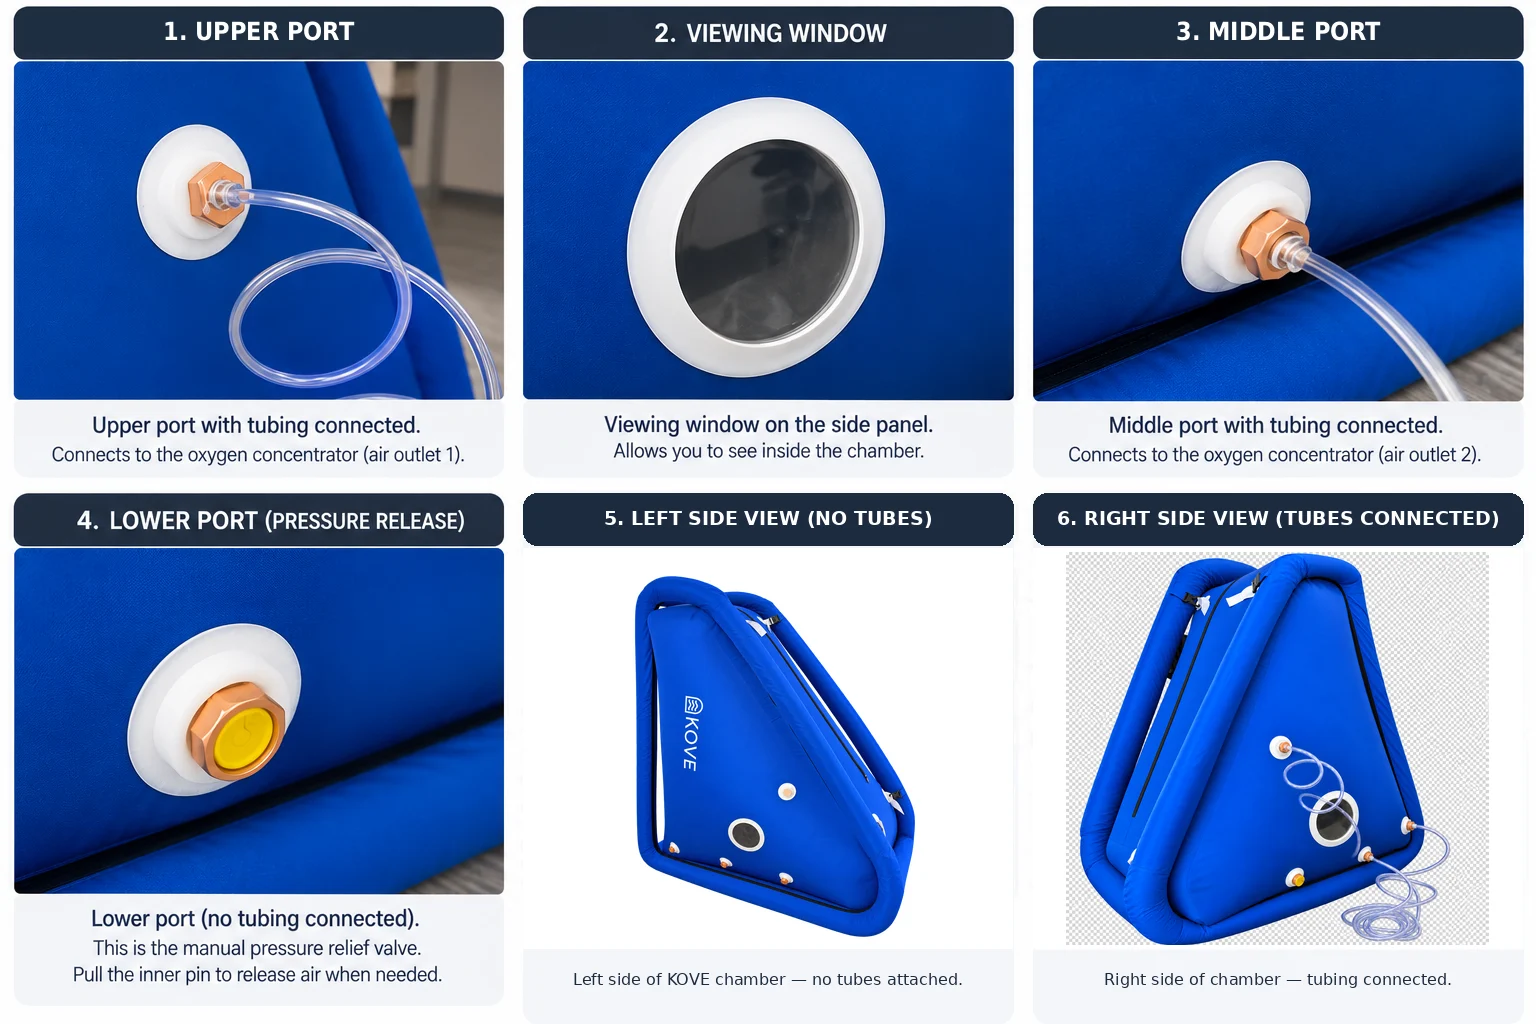
Confirm all connections against the equipment labels before operation.
THREE MACHINE CONNECTIONS
The KOVE chamber has three supply connections. All three connect to the machine.
These supply connections are separate from the chamber’s pressure-release valves.
CONNECTION 1 — OXYGEN SUPPLY
Chamber: Oxygen inlet
Machine: Upper oxygen outlet
Tubing: 6 mm oxygen tube
CONNECTION 2 — COMPRESSED AIR 1
Chamber: Air inlet 1
Machine: Compressed-air outlet 1
Tubing: 8 mm air tube
CONNECTION 3 — COMPRESSED AIR 2
Chamber: Air inlet 2
Machine: Compressed-air outlet 2
Tubing: 8 mm air tube
CHECK ALL CONNECTIONS
Match each hose to its corresponding labelled chamber inlet and machine outlet. Ensure all connections are secure and the tubing is not kinked.
WARNING — PRESSURE-RELEASE VALVES
Never connect a hose to a manual or automatic pressure-release valve.
The internal manual pressure-release valve must remain accessible to the person inside the chamber.
03. Inflate the External Air-Column Support
STEP 1 — OPEN BOTH ZIPPERS
Leave both chamber zippers open while inflating the external support columns.
STEP 2 — PREPARE THE SUPPORT NOZZLE
Remove the inflation nozzle cover. Press the inner core so the core pin protrudes outward for inflation, as shown in the supplied instructions.
STEP 3 — ATTACH THE INFLATION ADAPTER
Connect one end of the inflation tube to the adapter and the other end to a compressed-air outlet on the machine. Secure the adapter to the support nozzle.
STEP 4 — INFLATE THE SUPPORT
Switch on the machine to inflate the support. The supplied instructions suggest approximately 1–3 minutes.
Stop when the support is firm enough to hold the chamber upright rather than relying on time alone.
STEP 5 — FINISH INFLATION
Switch off the air supply, remove the adapter and replace the nozzle cover.
IMPORTANT — DO NOT OVERINFLATE
Do not overinflate the external support columns.
04. Prepare the Chamber for a Session
STEP 1 — CHECK THE VALVES
Close the manual pressure-release valve as specified for pressurisation and check the fittings.
The supplied instructions describe clockwise rotation to tighten the external manual valve. The internal valve operates in the reverse direction.
STEP 2 — CHECK THE THREE SUPPLY TUBES
Confirm the oxygen tube and both compressed-air tubes are correctly attached to their labelled machine outlets and chamber inlets.
STEP 3 — ENTER & SEAL THE CHAMBER
After the person enters the chamber, close the inner zipper completely, followed by the outer zipper.
Ensure both zippers are fully closed before pressurisation.
IMPORTANT — BEFORE STARTING
The person inside must understand where the internal manual pressure-release valve is located and how to release it.
Keep a trained attendant present throughout operation.
05. Start the Machine
START THE SESSION
Switch on the oxygen/air machine.
The supplied instructions describe both compressed-air outlets operating initially. After approximately five minutes, the middle air outlet stops and the upper oxygen outlet begins supplying oxygen.
USE THE SUPPLIED OXYGEN MASK
The original instructions mention fitting the oxygen mask.
Use the equipment only with the prescribed session settings and appropriate supervision.
IMPORTANT — SESSION SETTINGS
Pressure settings and medical suitability must be established for the specific equipment and user. Do not assume generic specifications apply to this KOVE chamber.
06. During the Session
MONITOR COMFORT & EQUIPMENT
The attendant should monitor the person and equipment throughout the session.
WARNING — STOP IF UNWELL
Stop the session if the occupant feels unwell or experiences significant ear discomfort, pain, breathing difficulty or another concerning symptom.
EQUALISE EAR PRESSURE
Pressure changes can cause ear discomfort. The supplied instructions describe swallowing or gentle ear-pressure equalisation during pressure changes.
Do not force equalisation if it is painful.
07. Depressurise & Exit
STEP 1 — STOP THE MACHINE
At the end of the session, switch off the oxygen/air machine.
STEP 2 — RELEASE THE INTERNAL VALVE
The person inside the chamber must open the internal manual pressure-release valve to release chamber pressure in a controlled manner.
STEP 3 — WAIT FOR COMPLETE DEPRESSURISATION
Keep both zippers closed while air is released.
Continue normal breathing. Do not hold your breath during depressurisation.
STEP 4 — UNZIP & EXIT
Only after the chamber has fully depressurised and returned to ambient pressure may the person inside unzip both zippers and exit.
CRITICAL — NEVER OPEN WHILE PRESSURISED
Never unzip either chamber zipper while the chamber remains pressurised.
08. Care, Storage & Precautions
AFTER EACH SESSION
Keep the chamber interior clean and dry. Do not leave litter or liquids inside.
Inspect hoses, valves and zippers before the next use.
STORAGE
Store the chamber in a dry, ventilated location protected from rain, direct sunlight, strong impacts and corrosive substances.
HEALTH PRECAUTIONS
The supplied reference identifies several conditions for which chamber use may be unsuitable, including certain ear, sinus, respiratory, cardiovascular and pregnancy-related conditions.
Obtain appropriate clinical clearance before use, particularly if you have a medical condition.
IMPORTANT EQUIPMENT INFORMATION
The original reference covers multiple chamber shapes. This KOVE manual uses the confirmed three-line connection arrangement for the blue chamber.
Pressure settings and medical suitability must be established for the specific equipment and user. Generic specifications are not confirmed KOVE ratings.
Need Assistance?
Contact the KOVE team for HBOT chamber product enquiries, setup information and assistance.
Email
[email protected]
Website
www.kovedesigns.com.au
HBOT CHAMBER USER MANUAL